Self Hosting LightCMS
デプロイセルフホスト LightCMS に関するガイドでは、GitHub App、PostgreSQL、環境変数、オプションのAI、CDN、メール、エッジへのデプロイについて説明します。
LightCMSを完全にコントロールしたいですか? LightCMSは SvelteKit アプリケーションで、PostgreSQLデータベースとGitHubアプリ(Octkit)によってバックアップされたどこでもデプロイできます。コンテンツがあなた自身のGitHubリポジトリから離れることはありません。
このガイドでは、GitHub Appの作成、 PostgreSQLのプロビジョニング、環境変数の設定、デプロイなど、独自のインスタンスを実行するために必要なすべてを説明します。
ピースがどのようにフィットするか
| コンポーネント | 目的 | 必須 |
|---|---|---|
| PostgreSQL | ユーザー、セッション、パスキー、GitHub インストールを保存します | はい |
| GitHub App | リポジトリにコンテンツを読み書きし、GitHubでユーザーに署名します | はい |
| SMTPプロバイダー | マジックリンクのサインインメールを送信 | はい、マジックリンクのサインイン用 |
| OpenAI 互換の API | AIコピロットを強化する | 省略可能 |
| 音声からテキストへの API | 音声のディクテーションを強化します | 省略可能 |
| 画像CDN | エディタにアップロードされたホスト画像 | 省略可能 |
| PostHog | 製品分析と AI の可観測性 | 開発のみに必要です |
前提条件
- mise: タスクの依存関係をインストールおよび管理します。このガイドでは、インストールされていることを前提としています。
- PostgreSQL: TLS 接続を受け付けるデータベース。 Neon、 Supabase または Nile のようなクラウドプロバイダーはうまく機能します。無料オプションについては、 awesome-free-postgres をご覧ください。
- GitHub アカウント: GitHub アプリを登録する必要があります。
- SMTP provider (for magic links): If you have a domain, Resend is a good option. それ以外の場合は、 Zoho Mail を使用し、アプリのパスワードを作成します。
TLSは必須です。 アプリケーションは、
ssl: "require"でPostgreSQLに接続します。 TLS が有効になっていないローカルの PostgreSQL インスタンス は拒否されるため、ホストされたデータベースを使用するか、独自のサーバーで TLS を設定します。
1. リポジトリをフォークして依存関係をインストールする
リポジトリをクローンし、依存関係をインストールします。
cd lightcms
mise trust
mise deps
mise run install
2. Create the GitHub App
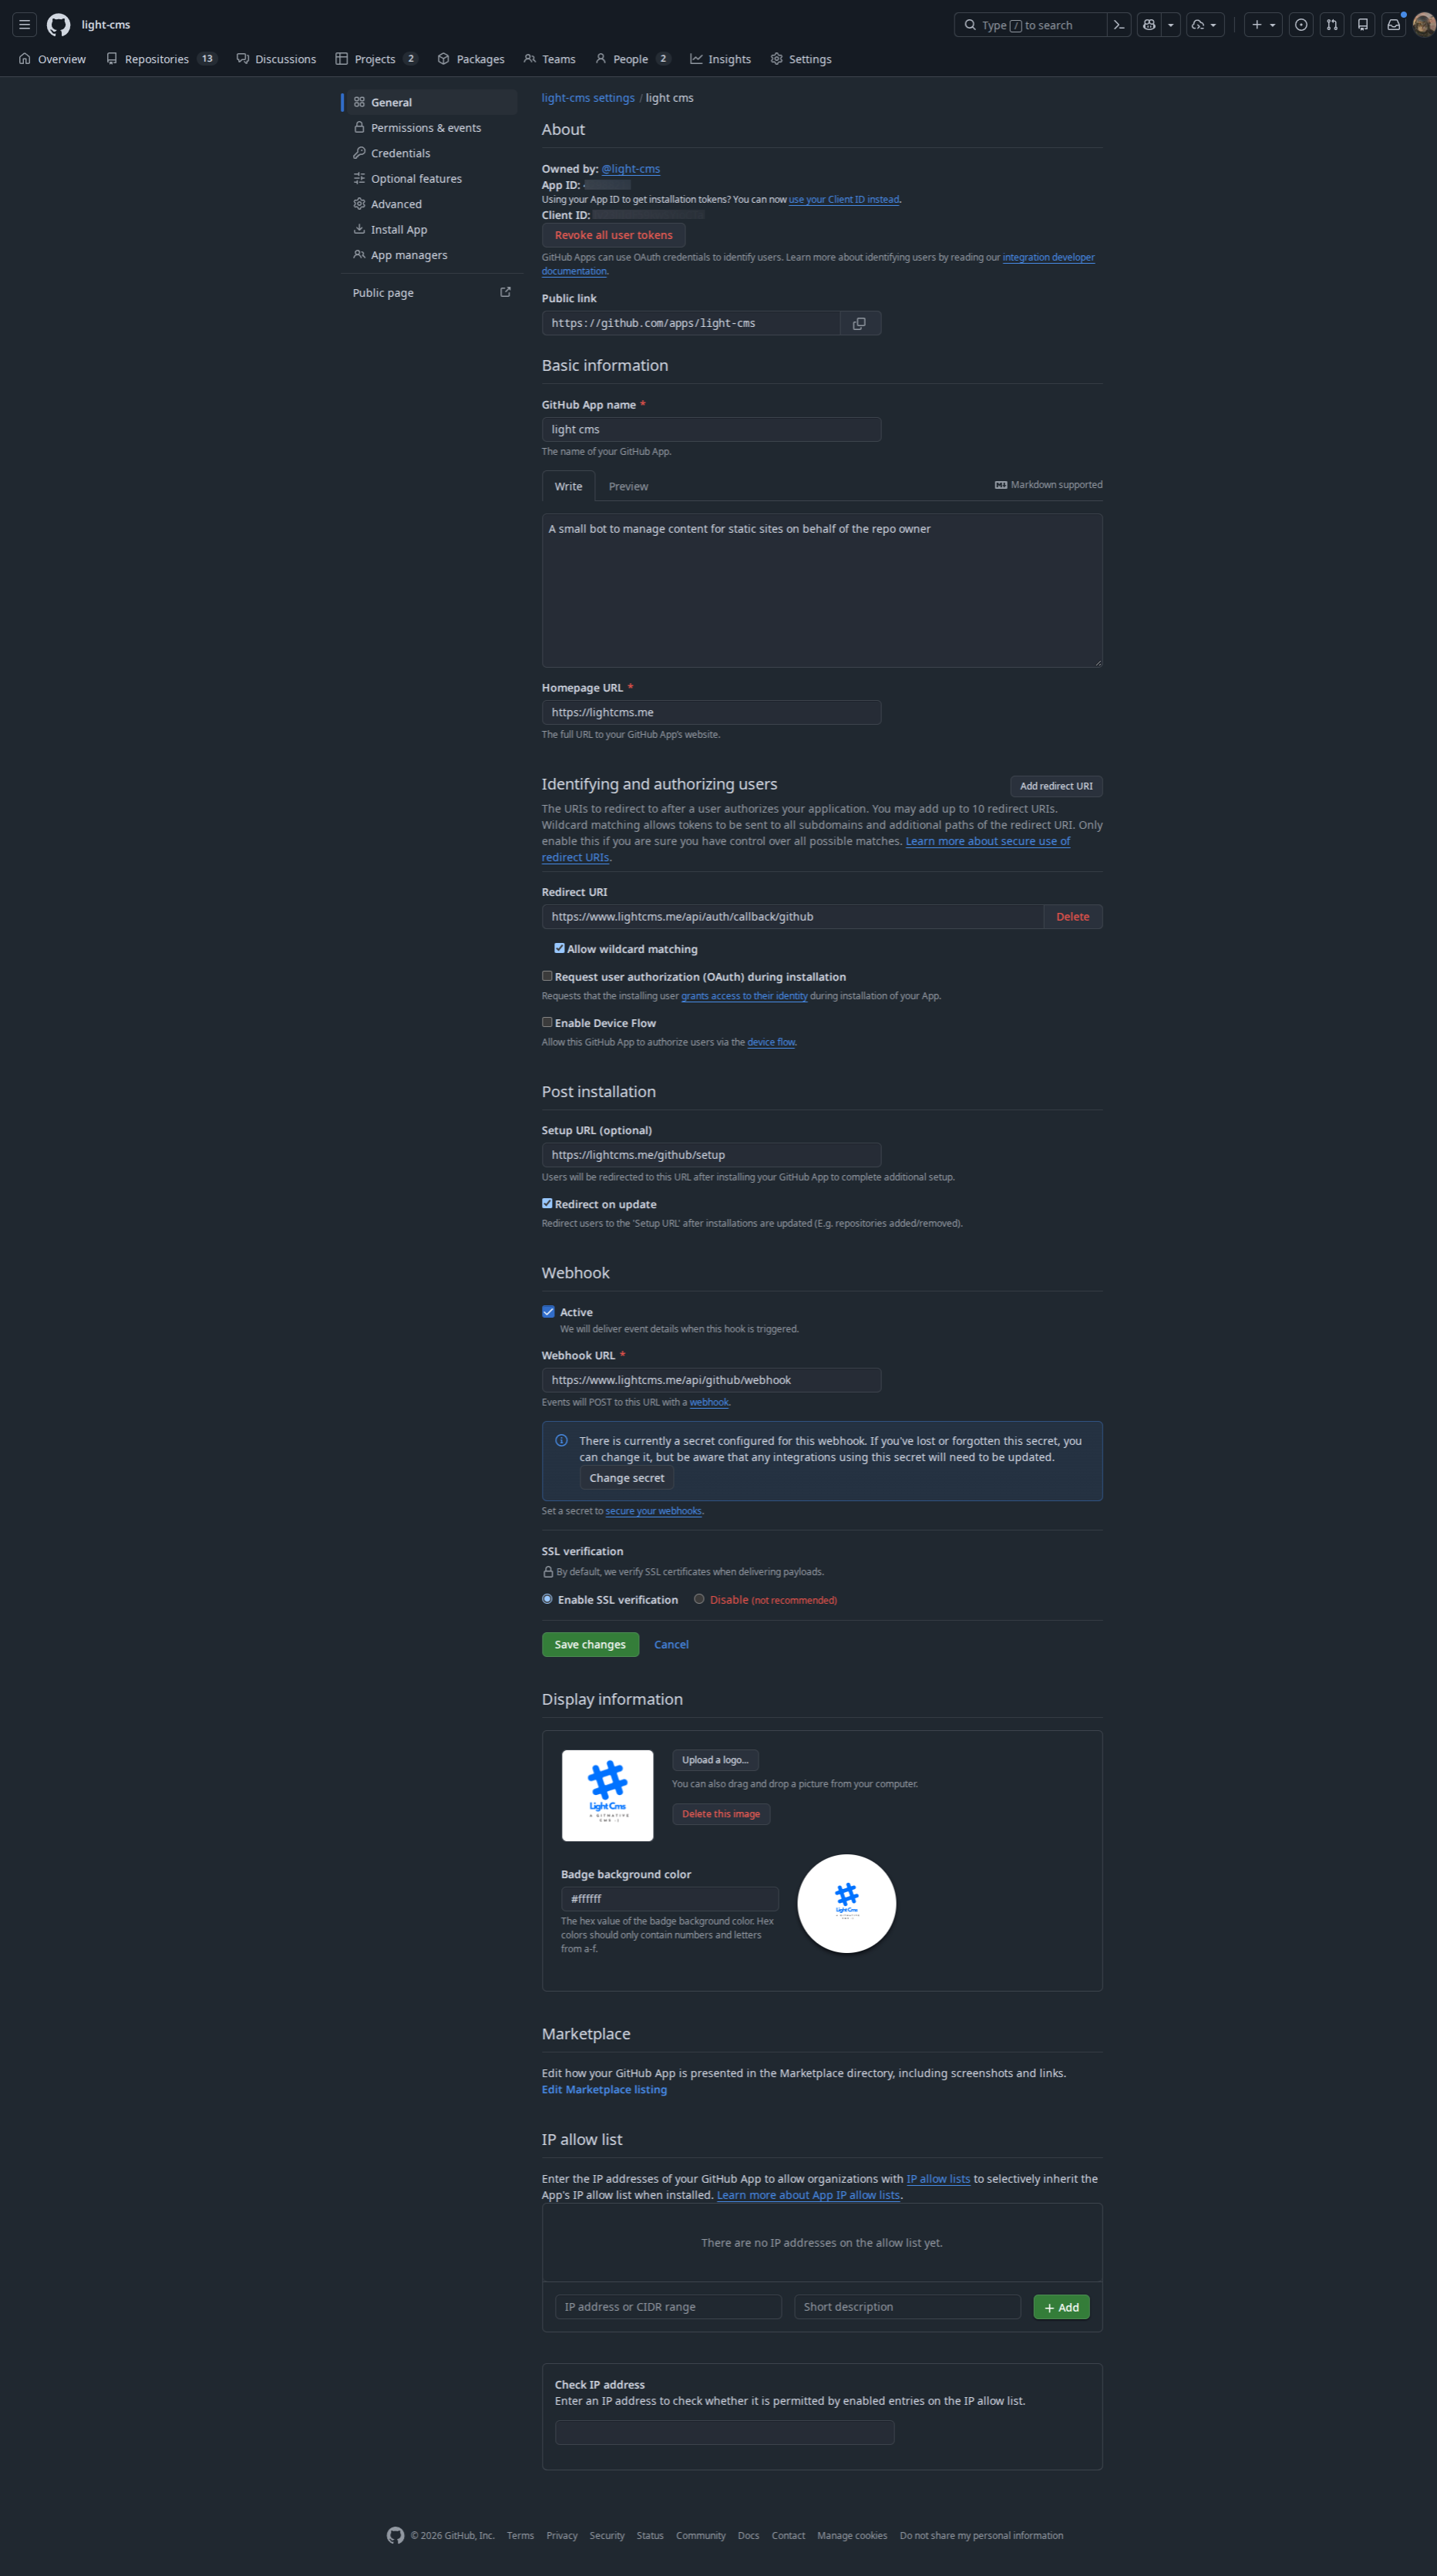
LightCMS uses a GitHub App for two things: signing users in with GitHub (OAuth), and acting on your behalf through installations. 内蔵のProbotセットアップウィザードを使用するか、手動で作成できます。
オプションA:プロボットセットアップウィザード
ボットの起動:
Mise run bot.envに認証情報がない場合、Probot はセットアップサーバーを http://localhost:3000 で起動します。
- Open
http://localhost:3000and click Register GitHub App. - 個人アカウントまたは組織を選択します。
- 確認する Probot はアプリを作成し、認証情報を
.envファイルに書き込みます。
ウィザードは、LightCMSのWebhookの エンドポイントではなく、アプリのWebhookのURLをSmeeチャンネル(またはhttp://localhost:3000/ )に設定します。公開する前にGitHub Appの設定で更新してください ( Productionデプロイメント を参照してください)。
オプションB:手動セットアップ
GitHub 設定 → 開発者設定 → GitHub アプリ → 新しい GitHub アプリ で以下の値を使用します。
| 設定 | 値 |
|---|---|
| ホームページ URL | https://<your-domain> |
| Callback URL | https://<your-domain>/api/auth/callback/github |
| Setup URL | https://<your-domain>/github/setup |
| Webhook URL | https://<your-domain>/api/github/webhook |
| Webhook secret | A random secret (see Generating secrets) |
リポジトリの権限
| アクセス許可 | アクセス | 使用先 |
|---|---|---|
内容 |
読み込みと書き込み | コンテンツファイルの読み込みとコミット |
課題 |
読み込みと書き込み | プルリクエストのコメントとラベルをレビューする |
プルリクエスト |
読み取り専用 | プルリクエストで変更されたファイルの一覧 |
コミットのステータス |
読み込みと書き込み | プッシュ時のコンテンツ検証のレポート |
メタデータ |
読み取り専用 | すべての GitHub アプリに必須です |
Subscribe to events: Push and Pull request. Installation events are delivered to GitHub Apps automatically.
After creating the app, note the App ID, generate a client secret, and generate and download a private key (.pem).
3. Configure environment variables
Create a .env file in the project root. The repository does not ship a usable example file, so use the reference below.
Required
# ---------------------------------------------------------------------------
# Authentication (Better Auth)
# ---------------------------------------------------------------------------
BETTER_AUTH_SECRET="<output of: openssl rand -hex 32>"
# Public URL of this instance. Must match the URL users visit.
BETTER_AUTH_URL="http://localhost:5173"

# ---------------------------------------------------------------------------
# Database (PostgreSQL, TLS required)
# ---------------------------------------------------------------------------
DATABASE_URL="postgresql://user:password@host:5432/lightcms?sslmode=require"

# ---------------------------------------------------------------------------
# GitHub App
# ---------------------------------------------------------------------------
GITHUB_APP_ID="123456"
GITHUB_CLIENT_ID="Iv1.xxxxxxxxxxxx"
GITHUB_CLIENT_SECRET="<github-app-client-secret>"
GITHUB_WEBHOOK_SECRET="<webhook-secret>"
GITHUB_PRIVATE_KEY="-----BEGIN RSA PRIVATE KEY-----
...
-----END RSA PRIVATE KEY-----"
GITHUB_PRIVATE_KEY is the full PEM contents. Keep the line breaks and wrap the value in double quotes, which is how the Probot wizard writes it.
Required for development
LightCMS reports analytics and errors to PostHog. When the keys are missing, the app throws in development to stop events being silently dropped. In production they are optional, and telemetry is skipped when they are unset.
VITE_POSTHOG_PROJECT_TOKEN="phc_xxxxxxxxxxxx"
VITE_POSTHOG_HOST="https://us.i.posthog.com"
Email: required for magic-link sign-in
Magic links are sent over SMTP with Nodemailer. Sending fails with a configuration error when MAIL_HOST, MAIL_USER, MAIL_PASS or MAIL_FROM is missing.
MAIL_HOST="smtp.resend.com"
# Defaults to 587 when omitted
MAIL_PORT="465"
# "true", "1", "yes" or "on" enables implicit TLS. When omitted, TLS is enabled only for port 465.
MAIL_SECURE="1"
MAIL_USER="resend"
MAIL_PASS="<smtp-password-or-api-key>"
MAIL_FROM="LightCMS <[email protected]>"
Optional: AI Copilot
The Copilot uses any OpenAI-compatible chat completions API. All three variables are needed for it to work.
OPEN_AI_ENDPOINT="https://api.openai.com/v1"
OPEN_AI_APIKEY="sk-..."
OPEN_AI_MODEL="gpt-4o-mini"
Any provider that exposes an OpenAI-compatible API works, for example OpenAI, OpenRouter (https://openrouter.ai/api/v1) or NVIDIA NIM.
Optional: speech-to-text dictation
LightCMS supports two transcription backends. When both are configured, the OpenAI-compatible backend is used.
OpenAI-compatible transcription. It is selected when SPEECH_API_KEY is set, and also needs SPEECH_MODEL:
SPEECH_API_KEY="<api-key>"
SPEECH_MODEL="whisper-1"
# Base URL of the provider. Omit it to use the OpenAI default.
SPEECH_ENDPOINT="https://api.openai.com/v1"
Point SPEECH_ENDPOINT at any provider that implements the /audio/transcriptions API, and set SPEECH_MODEL to a model that provider offers. A trailing /audio/transcriptions in the endpoint is stripped automatically.
Wit.ai is used when SPEECH_API_KEY is not set:
WIT_AI_TOKEN="<wit-ai-server-access-token>"If neither is configured, dictation is unavailable.
Optional: image uploads (CDN)
Images pasted or uploaded in the editor are sent to a Chevereto-compatible upload API. Hosted options include FreeImage.host and ImgBB, or you can run your own Chevereto instance.
CDN_URL="https://freeimage.host/api/1/upload"
CDN_KEY="<cdn-api-key>"
CDN_KEY は キー クエリパラメータとして CDN_URL が既に含まれていない限り送信されます。 If the upload fails or the variables are unset, LightCMS falls back to embedding the image in the document as a base64 data: URL. これは ですが、Markdown ファイルがはるかに大きくなりますので、CDN を実際に使用するように設定してください。
ローカルWebフック転送 (開発のみ)
WEBHOOK_PROXY_URL="https://smee.io/<your-channel>"これは、SvelteKitアプリではなく、Probotによって読み込まれます。ローカルで Webhookのテストを参照してください。
シークレットの生成
これらのいずれかを使用して、 BETTER_AUTH_SECRET と GITHUB_WEBHOOK_SECRET を生成します。
openssl rand -hex 32
# or
node -e "console.log(require('crypto').randomBytes(32).toString('hex'))"
4. データベースのセットアップ
LightCMSは 霧雨ORMを使用しています。 The schema lives in src/lib/server/db/schema.ts, and migrations are generated into the drizzle directory. DATABASE_URL が設定されている場合、マイグレーションを適用します。
bunの実行db:migrateローカル開発中は、ファイルを移行せずにスキーマを直接データベースにプッシュすることができます。
bunの実行db:push他のデータベーススクリプト:
| (Command) | 説明 |
|---|---|
bun db:generate |
スキーマの編集後にマイグレーションを生成する |
bun run db:studio |
Drizzle Studio でデータを閲覧し、編集します |
5. ローカルで実行
Bun dev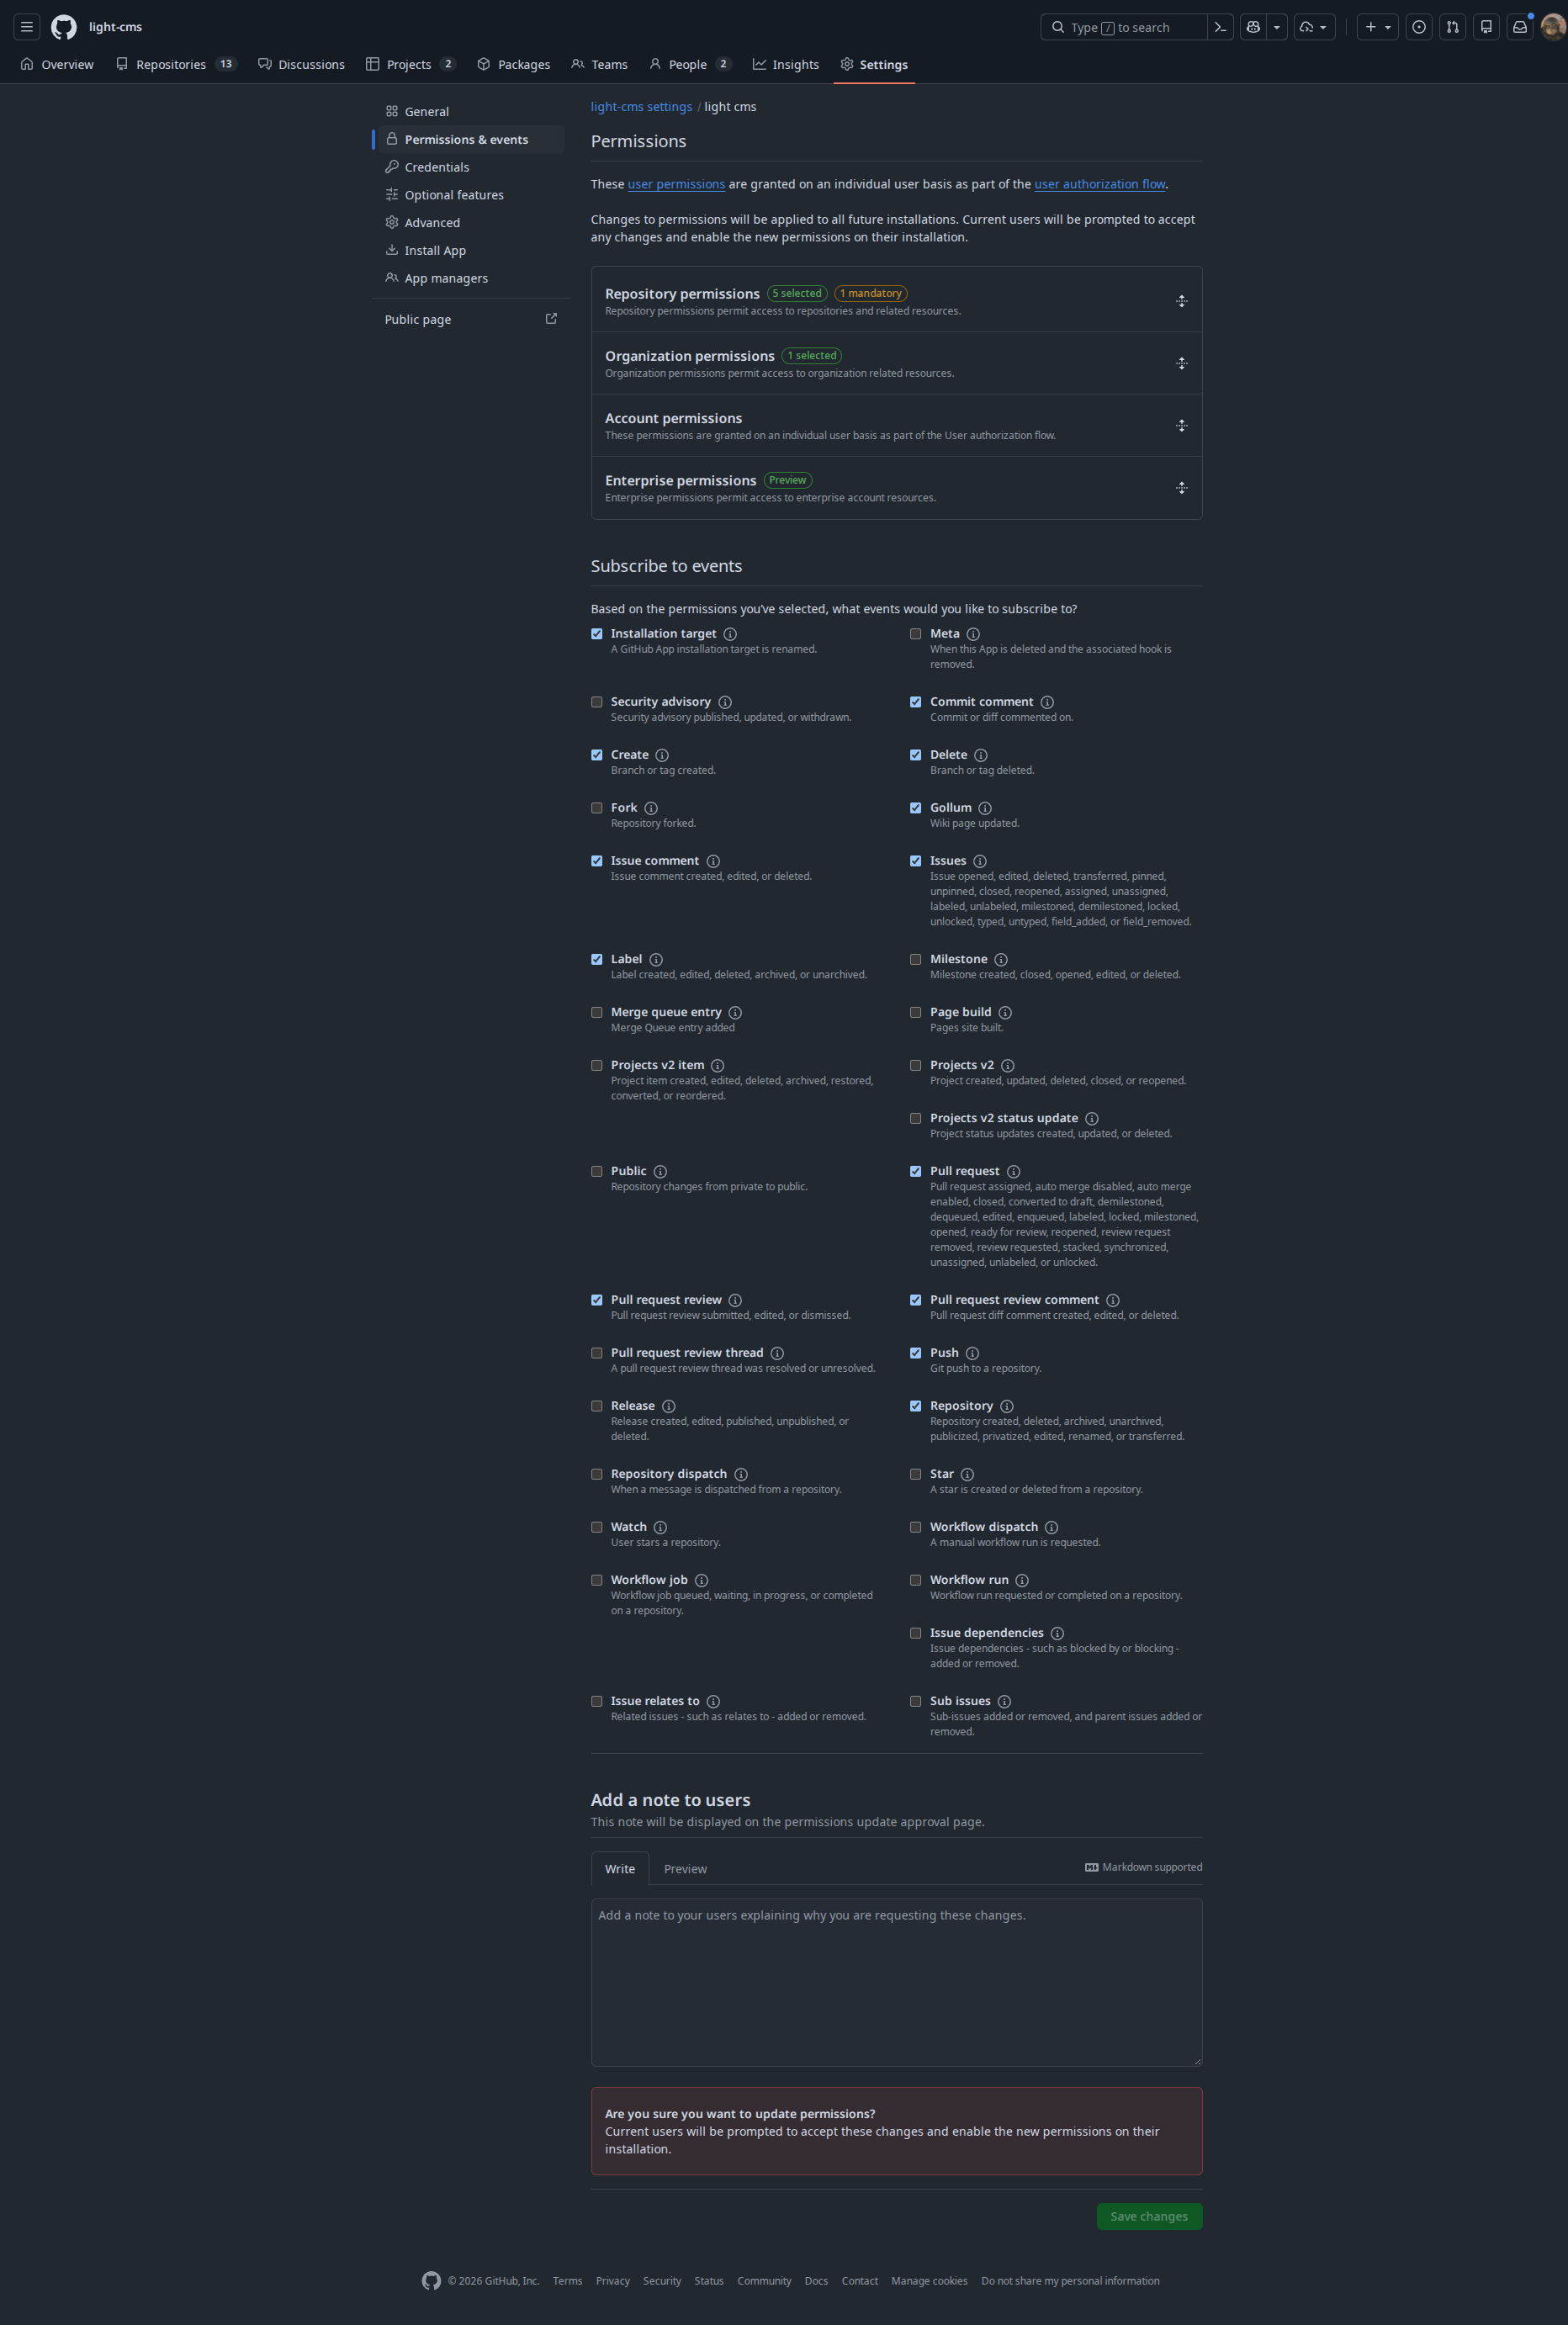

LightCMS は http://localhost:5173 で利用可能になりました。 BETTER_AUTH_URL をこのアドレスに設定し、GitHubで初めてログインします。
ローカルでWebhookをテストする
GitHub は localhostにWebhookを配信できません。 smee.io:
smee.io でチャンネルを作成し、そのURLをコピーします。
WEBHOOK_PROXY_URLを.envにそのURLに設定します。GitHub アプリの設定で Webhook URL を同じ URL に設定します。
2番目の端末でBotを実行します:
bun run bot:start
The bot registers the same handlers as the production endpoint: content validation on push, review comments and labels on pull_request, and installation logging.
6. プロダクションデプロイメント
このプロジェクトは、ベンダーに依存しないSvelteKitで構成されています。 Vercel, Netlify と Cloudflare Worker は、すべてサポートされている デプロイメントターゲットはすぐにはありません。
- Git リポジトリをデプロイメントプラットフォームにインポートします。
- ステップ 3 から プロジェクト設定 → 環境 変数 にすべての環境変数を追加します。プロダクションURLに
BETTER_AUTH_URLを設定します。 - デプロイ。
本番環境のビルドをローカルで検証するには:
bun run build
bun run preview
トラブルシューティング
Make a account with Wit.ai it's a free service by meta | And any openai compatible API for transcription. | One can use groq or assemblyai or | elevenlabs or deepgram or sarvam. |
PostHog Credentials
あなた自身の PostHog プロジェクト (プロジェクト設定 → プロジェクト API キー ) からプロジェクトトークンを使用します。 Do not reuse a token from this documentation: events sent with a shared token land in someone else's project, so its insights, alerts and notifications are not yours to read.
VITE_POSTOG_PROJECT_TOKEN=phc_your_project_token
VITE_POSTOG_HOST=https://us.i.posthog.com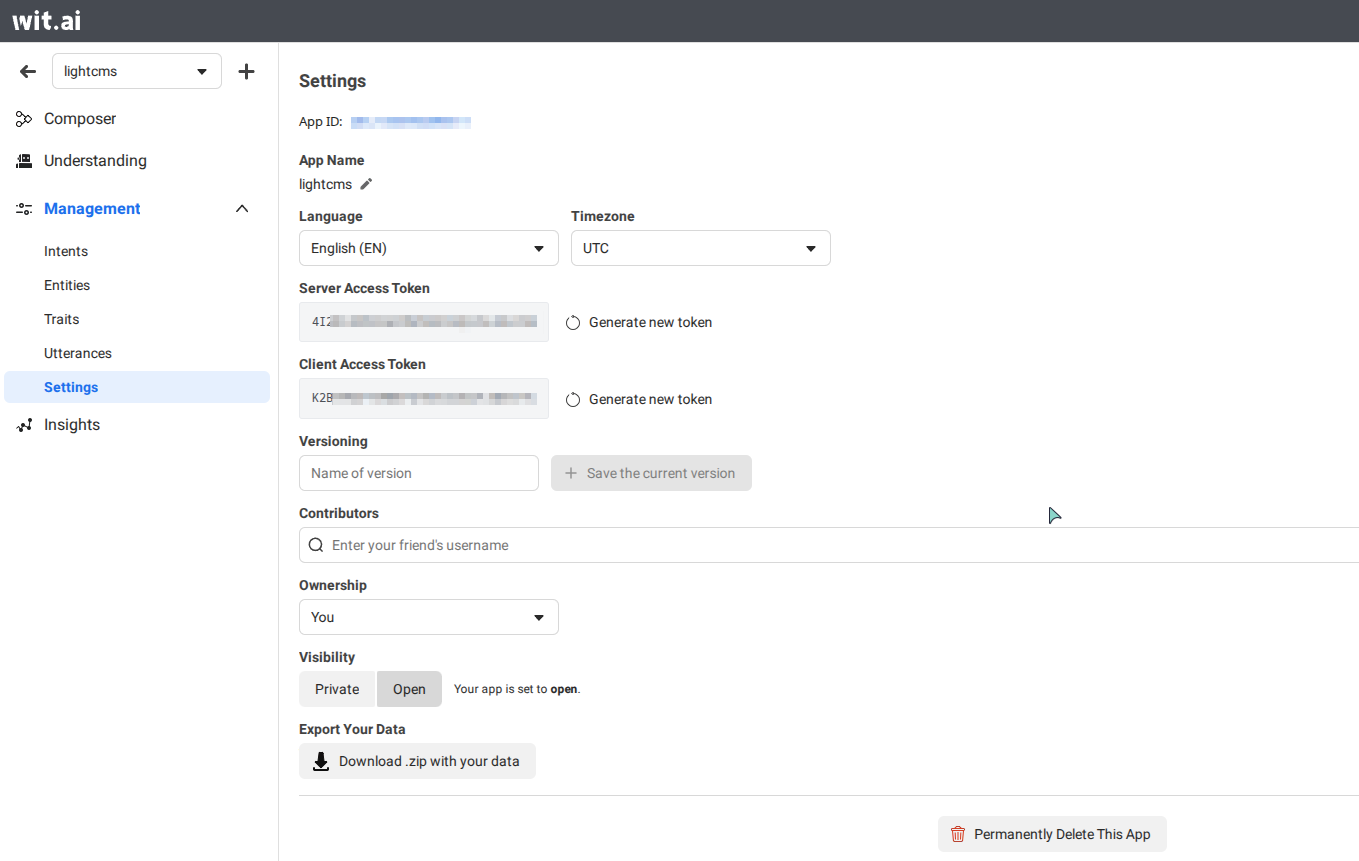
WIT_AI_TOKEN="サーバーアクセストークン"
WIT_AI_CLIENT_TOKEN="クライアントアクセストークン"
APP_ID=
BETTER_AUTH_SECRET=
BETTER_AUTH_URL=
CDN_KEY=
CDN_URL=
DATABASE_URL=
GITHUB_APP_ID=
GITHUB_APP_NAME=
GITHUB_CLIENT_ID=
GITHUB_CLIENT_SECRET=
GITHUB_PRIVATE_KEY=
GITHUB_WEBHOOK_SECRET=
MAIL_FROM=
MAIL_HOST=
MAIL_PASS=
MAIL_PORT=
MAIL_SECURE=
MAIL_USER=
OPEN_AI_ENDPOINT=
OPEN_AI_MODEL=
OPEN_AI_APIKEY=
ORIGIN=
PRIVATE_KEY=
VITE_POSTHOG_HOST=
VITE_POSTHOG_PROJECT_TOKEN=
SPEECH_API_KEY=
SPEECH_ENDPOINT=
SPEECH_MODEL=
WEBHOOK_SECRET=
WIT_AI_CLIENT_TOKEN=
WIT_AI_TOKEN=