自我托管的 LightCMS
部署自我主机 LightCMS指南,涵盖GitHub App,PostgreSQL,环境变量,可选的 AI,CDN 和电子邮件,并部署到边缘。
希望LightCMS完全在您的控制下? LightCMS 是 SwelteKit 应用程序,因此它可以部署在任何地方,由 PostgreSQL 数据库和 GitHub App (OctorKit 支持)。您的内容永远不会离开您自己的 GitHub 仓库。
本指南使您走遍运行自己实例所需的一切:创建 GitHub 应用程序,提供 PostgreSQL,配置环境变量和部署。
区块如何一起适合的
| 组件 | 目的 | 必填 |
|---|---|---|
| PostgreSQL | 存储用户、会话、密钥和 GitHub 安装 | 否 |
| GitHub App | 读取和写入你的仓库中的内容,并使用GitHub 签署用户 | 否 |
| SMTP 提供商 | 发送魔法链接登录邮件 | 是的,用于魔法链接登录 |
| OpenAI兼容的 API | 授权 AI 复制器 | 可选的 |
| 语音到文本 API | 授权语音听音 | 可选的 |
| 图像 CDN | 上传到编辑器中的主机图像 | 可选的 |
| Posthog | 产品分析和 AI 可观测性 | 仅在开发中需要 |
必备条件
- mise: installs and manages task dependencies. 本指南假定您已经安装。
- PostgreSQL: 一个接受TLS连接的数据库。云端提供商如 Neon, Supabase 或 Nile 运作良好。 See awesome-free-postgres for free options.
- GitHub 帐户: 需要注册 GitHub 应用程序
- SMTP provider (for magic links): If you have a domain, Resend is a good option. Otherwise, use Zoho Mail and create an app password.
TLS 是强制性的。 应用程序与 PostgreSQL 连接到
ssl: "require". 没有启用TLS的本地PostgreSQL 实例 将被拒绝,因此使用托管数据库或在您自己的服务器上配置TL。
1. 派生仓库和安装依赖关系
复制仓库并安装依赖:
cd lightcms
mise trust
mise deps
mise 运行安装
2. Create the GitHub App
LightCMS 使用GitHub 应用程序来处理两件事:使用 GitHub (OAuth) 签名用户,通过安装代表您进行 操作。您可以使用Probot 安装向导或手工创建它。
备选案文A:Probot 安装向导
启动机器人:
mise 运行机器人.env没有凭据,Probot在 http://localhost:3000 启动设置服务器:
- 打开
http://localhost:3000并点击 注册 GitHub App。 - 选择您的个人帐户或组织。
- 确认. 无人机创建应用程序并将其证书写入您的
.env文件。
向导将应用的 webhook URL 设置为 Smee 频道 (或 http://localhost:3000/),而不设置为 LightCMS 的 webhook 端点。在运行前在 GitHub 应用程序设置中更新它 (见 生产部署)。
选项B:手动设置
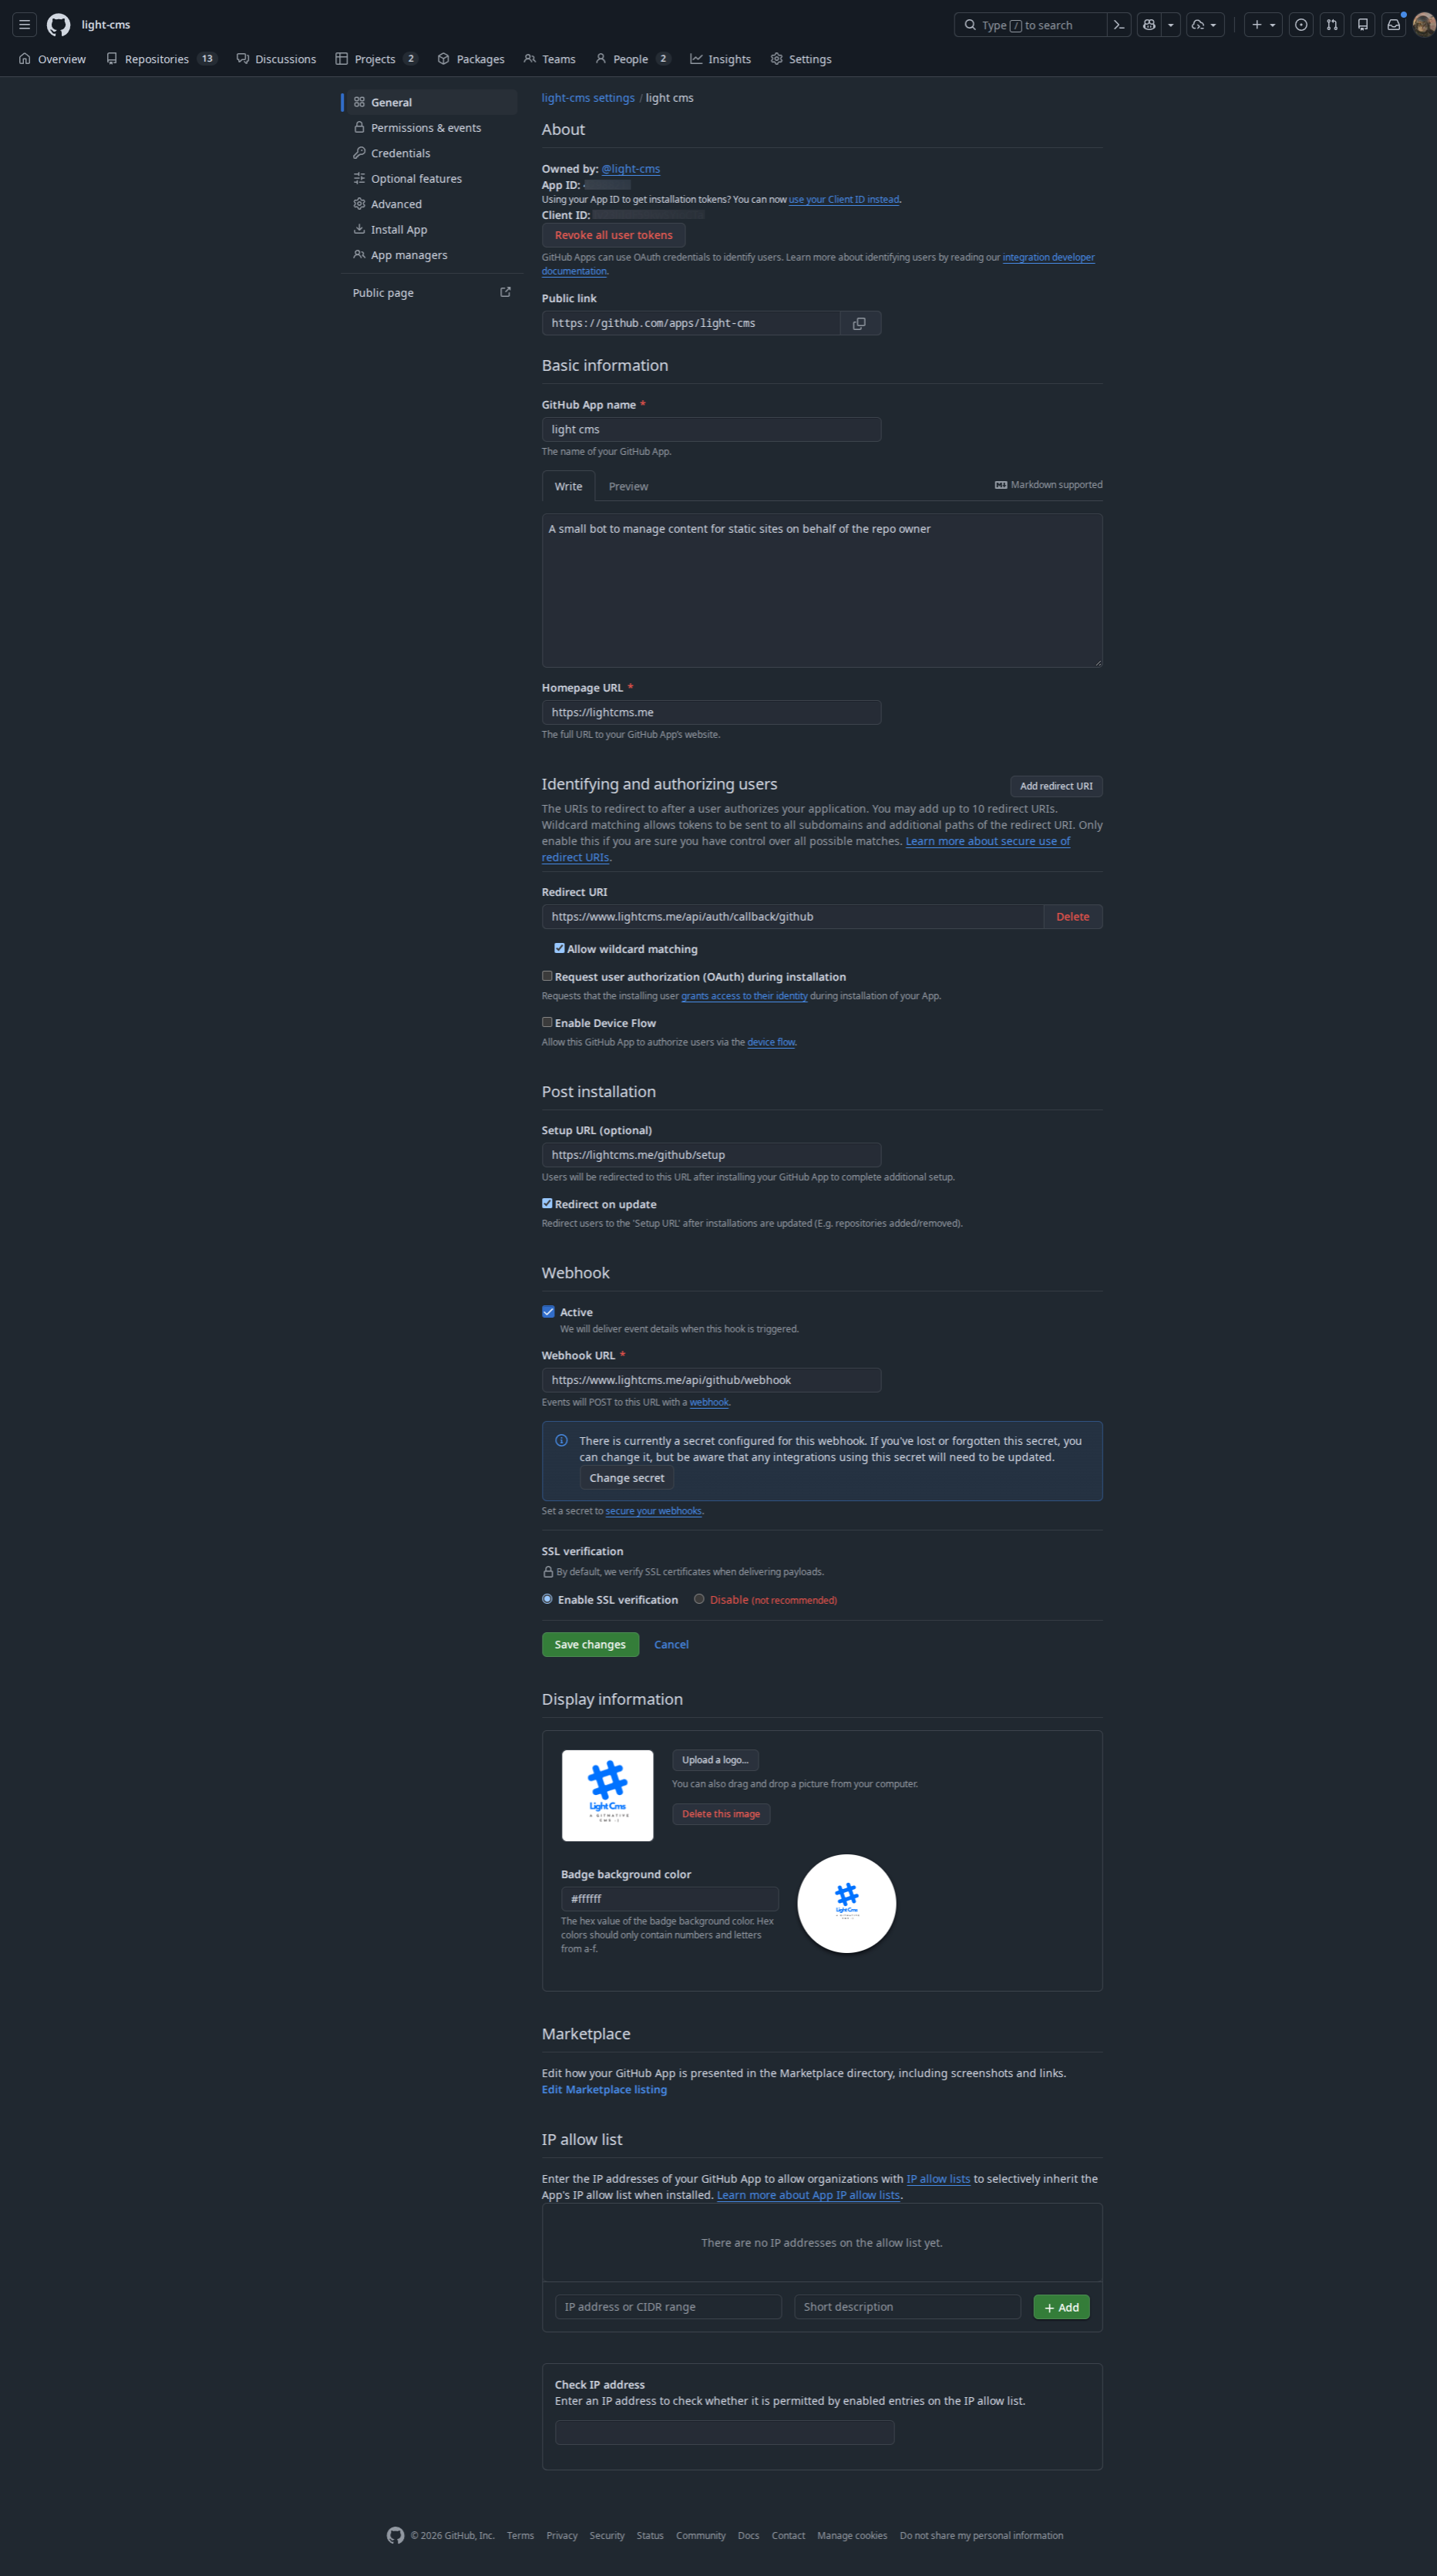
在 GitHub 设置 -> 开发者设置 -> GitHub 应用程序 -> 新 GitHub App 中创建应用程序,这些值:
| 设置 | 值 |
|---|---|
| 主页 URL | https:///<your-domain> |
| Callback URL | https://<your-domain>/api/auth/callback/github |
| Setup URL | https://<your-domain>/github/setup |
| Webhook URL | https:///<your-domain>/api/github/webhook |
| Webhook 密钥 | 随机私密(见 生成秘密) |
仓库权限
| 权限 | 访问权限 | 用于: |
|---|---|---|
目录 |
读写 | 读取和提交内容文件 |
Issues |
Read and write | Review comments and labels on pull requests |
Pull requests |
Read-only | Listing the files changed in a pull request |
Commit statuses |
Read and write | Reporting content validation on pushes |
Metadata |
Read-only | Mandatory for every GitHub App |
Subscribe to events: Push and Pull request. Installation events are delivered to GitHub Apps automatically.
After creating the app, note the App ID, generate a client secret, and generate and download a private key (.pem).
3. Configure environment variables
Create a .env file in the project root. The repository does not ship a usable example file, so use the reference below.
Required
# ---------------------------------------------------------------------------
# Authentication (Better Auth)
# ---------------------------------------------------------------------------
BETTER_AUTH_SECRET="<output of: openssl rand -hex 32>"
# Public URL of this instance. Must match the URL users visit.
BETTER_AUTH_URL="http://localhost:5173"

# ---------------------------------------------------------------------------
# Database (PostgreSQL, TLS required)
# ---------------------------------------------------------------------------
DATABASE_URL="postgresql://user:password@host:5432/lightcms?sslmode=require"

# ---------------------------------------------------------------------------
# GitHub App
# ---------------------------------------------------------------------------
GITHUB_APP_ID="123456"
GITHUB_CLIENT_ID="Iv1.xxxxxxxxxxxx"
GITHUB_CLIENT_SECRET="<github-app-client-secret>"
GITHUB_WEBHOOK_SECRET="<webhook-secret>"
GITHUB_PRIVATE_KEY="-----BEGIN RSA PRIVATE KEY-----
...
-----END RSA PRIVATE KEY-----"
GITHUB_PRIVATE_KEY is the full PEM contents. Keep the line breaks and wrap the value in double quotes, which is how the Probot wizard writes it.
Required for development
LightCMS reports analytics and errors to PostHog. When the keys are missing, the app throws in development to stop events being silently dropped. In production they are optional, and telemetry is skipped when they are unset.
VITE_POSTHOG_PROJECT_TOKEN="phc_xxxxxxxxxxxx"
VITE_POSTHOG_HOST="https://us.i.posthog.com"
Email: required for magic-link sign-in
Magic links are sent over SMTP with Nodemailer. Sending fails with a configuration error when MAIL_HOST, MAIL_USER, MAIL_PASS or MAIL_FROM is missing.
MAIL_HOST="smtp.resend.com"
# Defaults to 587 when omitted
MAIL_PORT="465"
# "true", "1", "yes" or "on" enables implicit TLS. When omitted, TLS is enabled only for port 465.
MAIL_SECURE="1"
MAIL_USER="resend"
MAIL_PASS="<smtp-password-or-api-key>"
MAIL_FROM="LightCMS <[email protected]>"
Optional: AI Copilot
The Copilot uses any OpenAI-compatible chat completions API. All three variables are needed for it to work.
OPEN_AI_ENDPOINT="https://api.openai.com/v1"
OPEN_AI_APIKEY="sk-..."
OPEN_AI_MODEL="gpt-4o-mini"
Any provider that exposes an OpenAI-compatible API works, for example OpenAI, OpenRouter (https://openrouter.ai/api/v1) or NVIDIA NIM.
Optional: speech-to-text dictation
LightCMS supports two transcription backends. When both are configured, the OpenAI-compatible backend is used.
OpenAI-compatible transcription. It is selected when SPEECH_API_KEY is set, and also needs SPEECH_MODEL:
SPEECH_API_KEY="<api-key>"
SPEECH_MODEL="whisper-1"
# Base URL of the provider. Omit it to use the OpenAI default.
SPEECH_ENDPOINT="https://api.openai.com/v1"
Point SPEECH_ENDPOINT at any provider that implements the /audio/transcriptions API, and set SPEECH_MODEL to a model that provider offers. A trailing /audio/transcriptions in the endpoint is stripped automatically.
Wit.ai is used when SPEECH_API_KEY is not set:
WIT_AI_TOKEN="<wit-ai-server-access-token>"If neither is configured, dictation is unavailable.
Optional: image uploads (CDN)
Images pasted or uploaded in the editor are sent to a Chevereto-compatible upload API. 托管的选项包括 FreeImage.host 和 ImgBB,或者您可以运行 您自己的Cheverto 实例。
CDN_URL="https://freeimage.host/api/1/upload"
CDN_KEY="<cdn-api-key>
CDN_KEY 已经以 键 查询参数发送,除非 CDN_URL 已经包含一个。如果上传失败或 变量未设置。 LightCMS 返回到将图像嵌入到文档作为Base64 数据: URL。此作品, 但它使得您的Markdown文件更大,所以配置一个 CDN 供真正使用。
本地Webhook 转发(仅开发)
WEBHOOK_PROXY_URL="https://sme.io/<your-channel>"这是由 Probot 而不是 SwelteKit 应用程序读取的。 See Testing webhooks locally.
正在生成密钥
使用其中任何一种生成 BETTER_AUTH_SECRET 和 GITHUB_WEBHOOK_SECRET
openssl rand -hex 32
# 或
节点 -e "console.log(require('crypto').randomBytes(32).toString('hex')"
4. 设置数据库
LightCMS uses Drizzle ORM. schema位于 src/lib/server/db/schema.tsand migrations 生成到 drizle 目录。使用 DATABASE_URL 应用迁移:
bun 运行 db:迁移在本地开发过程中,您可以直接将架构推送到数据库,而无需迁移文件:
bun 运行 db:put其他数据库脚本:
| 命令 | 描述 |
|---|---|
bun 运行 db:greater |
编辑schema后生成迁移 |
bun 运行 db:studio |
在 Drizzle Studio 浏览并编辑您的数据 |
5. 本地运行
bun 运行开发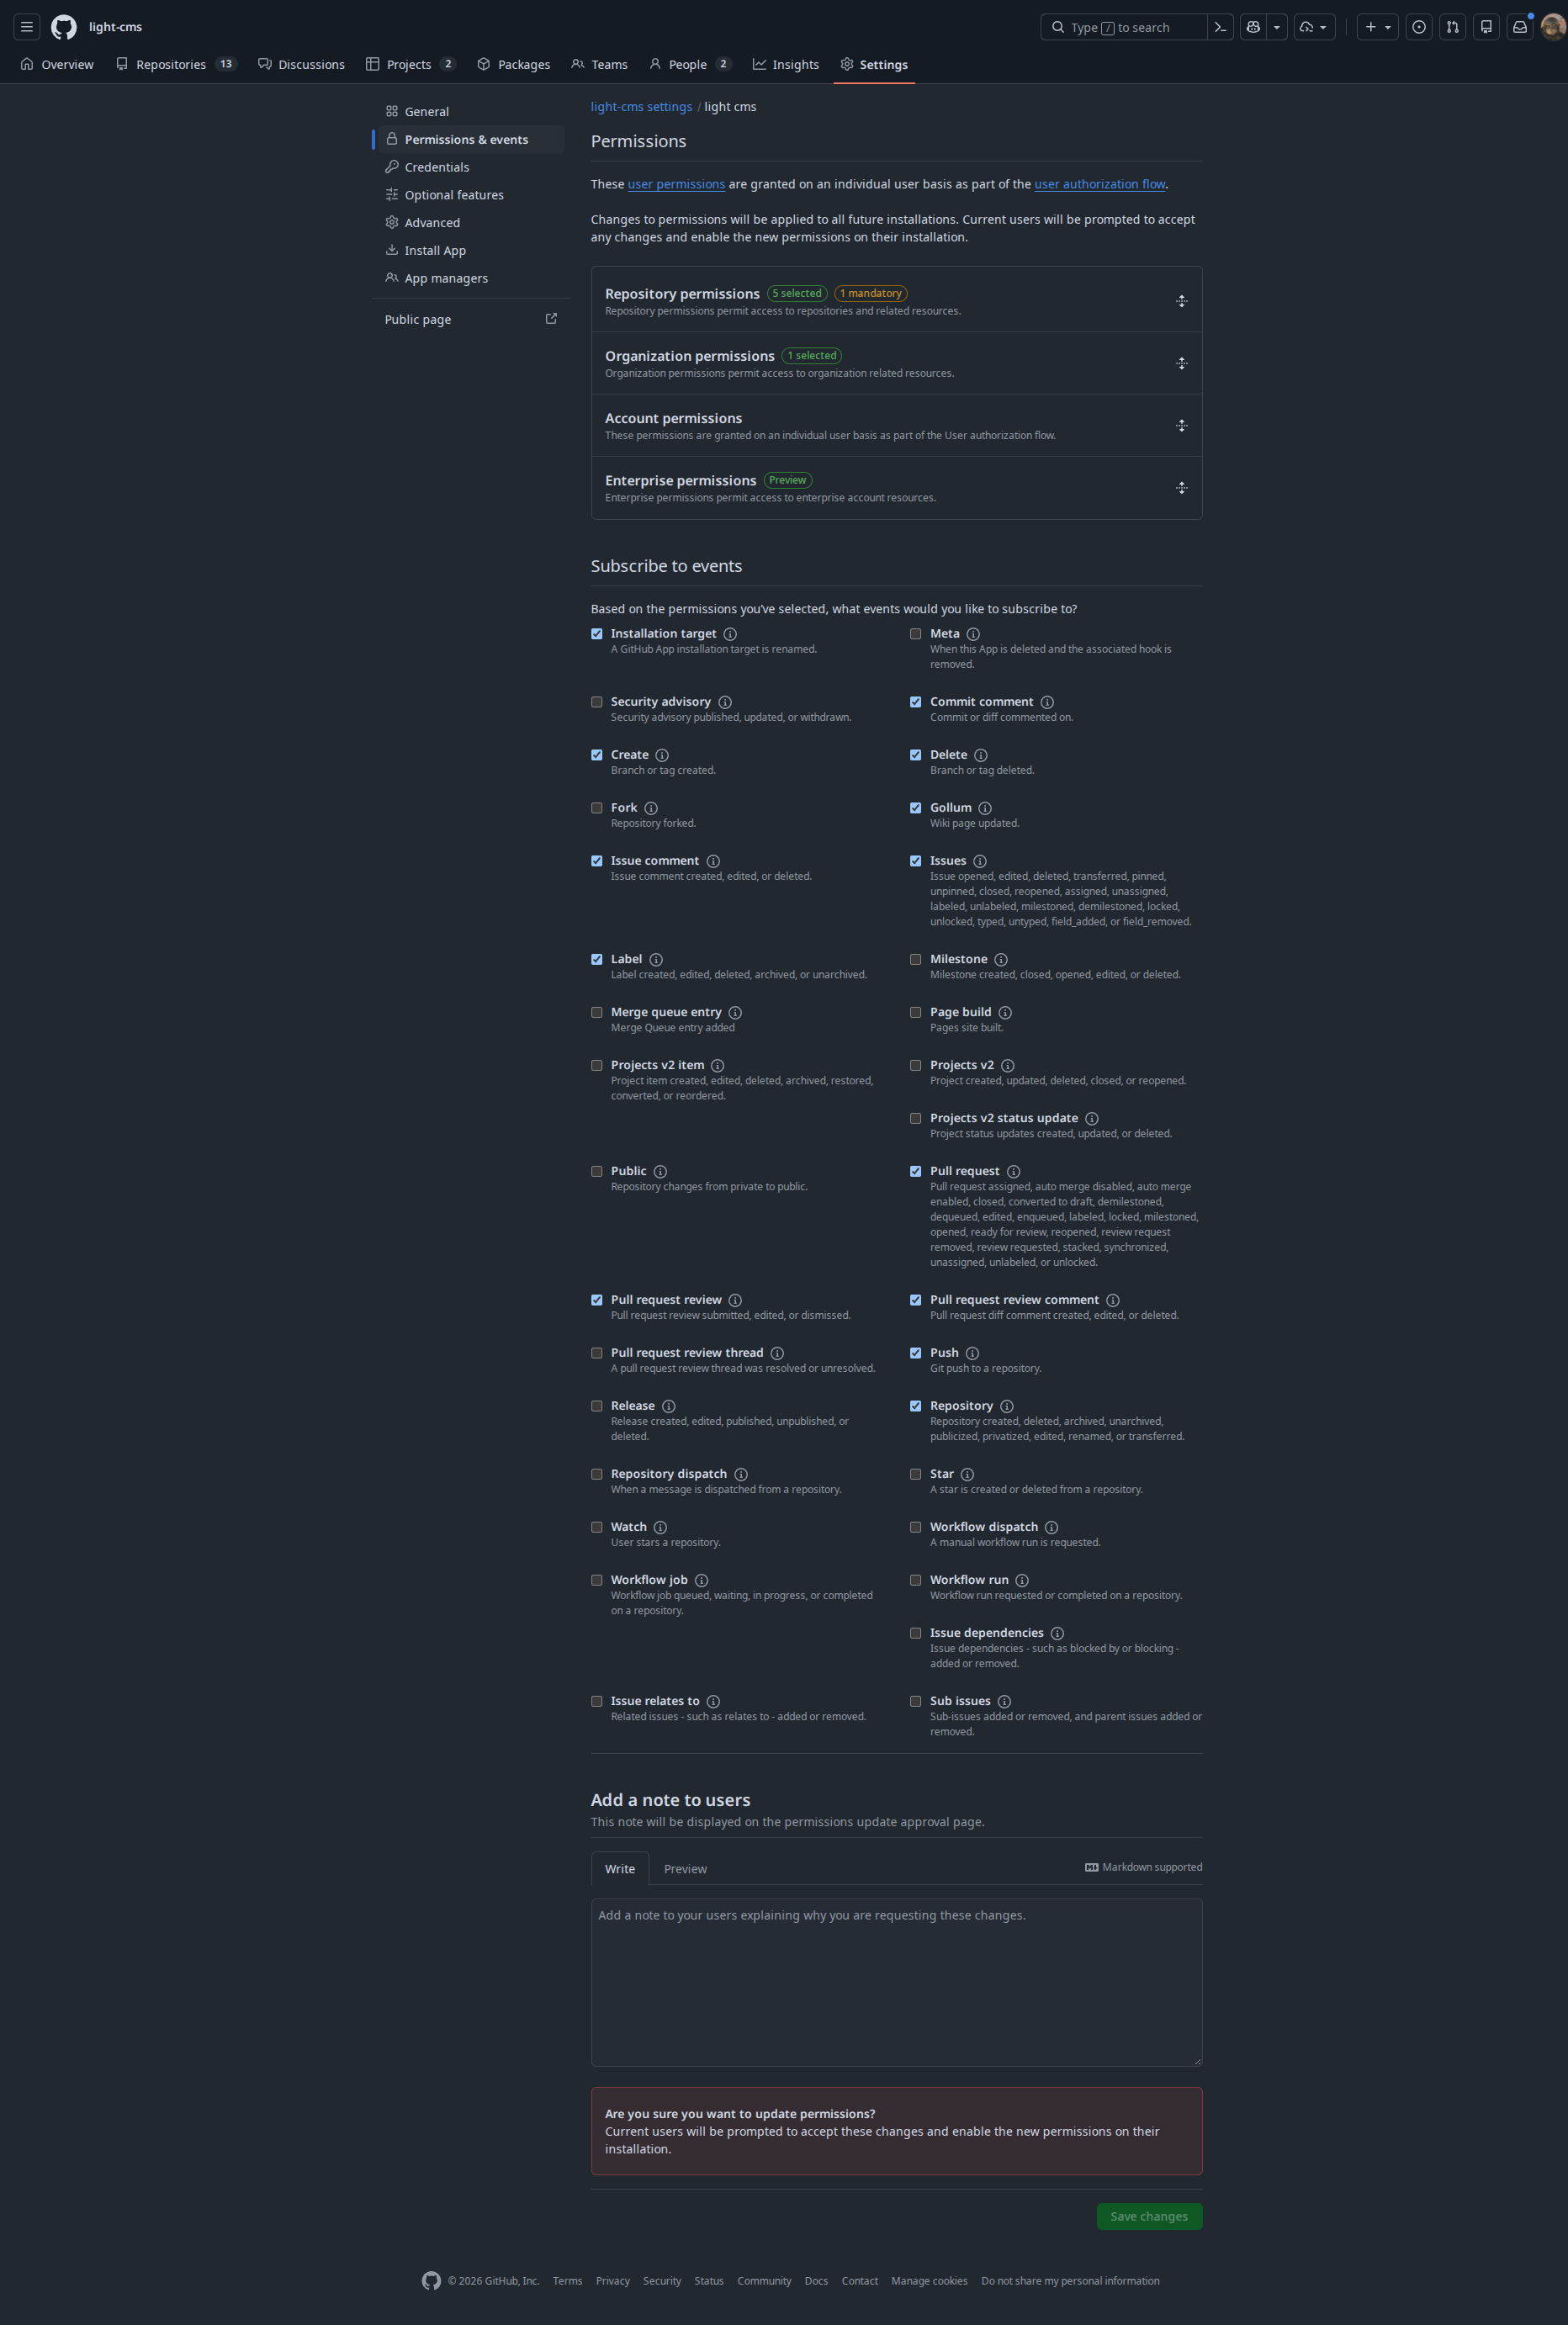

LightCMS现在可在 http://localhost:5173 获取。设置 BETTER_AUTH_URL 为这个地址,并首次使用 GitHub 登录。
本地测试网络钩子
GitHub cannot deliver webhooks to localhost, so forward them through smee.io:
在 sme.io 上创建一个频道并复制其URL。
设置
WEBHOOK_PROXY_URL为.env的URL。在您的 GitHub 应用程序设置中设置一个 Webhook URL 到相同的 URL。
在第二个终端运行机器人:
运行bun bot :start
The bot registers the same handlers as the production endpoint: content validation on push, review comments and labels on pull_request, and installation logging.
6. 生产部署
这个项目是由 SwelteKit 配置的,后者是供货商。 Vercel, Netlify and Cloudflare Workers 都支持 部署目标从箱子中移出。
- 将您的Git仓库导入到部署平台。
- Add every environment variable from step 3 in Project Settings → Environment Variables. 将
BETTER_AUTH_URL设置为您的产品 URL。 - 痛惜。
要验证本地生产版本:
bun 运行 building
bun 运行预览
故障排除
使用 Wit.ai 创建一个免费服务。由 meta | 和任何兼容的 Openai API 进行翻译。 | 一个人可以使用 groq 或 assembyai 或 | 11labs 或 deepgram 或 sarvam |
PostHog证书
使用 的项目令牌。您自己的 PostHog项目 (项目设置 -> 项目 API 密钥)。不要重新使用此文档中的令牌 :在其他人的项目中使用共享令牌土地发送的事件。 所以它的洞察力、警报和 通知不是您要阅读的。
VITE_POSTHOG_PROJECT_TOKEN=phc_your_project_token
VITE_POSTHOST=https://us.i.posthog.com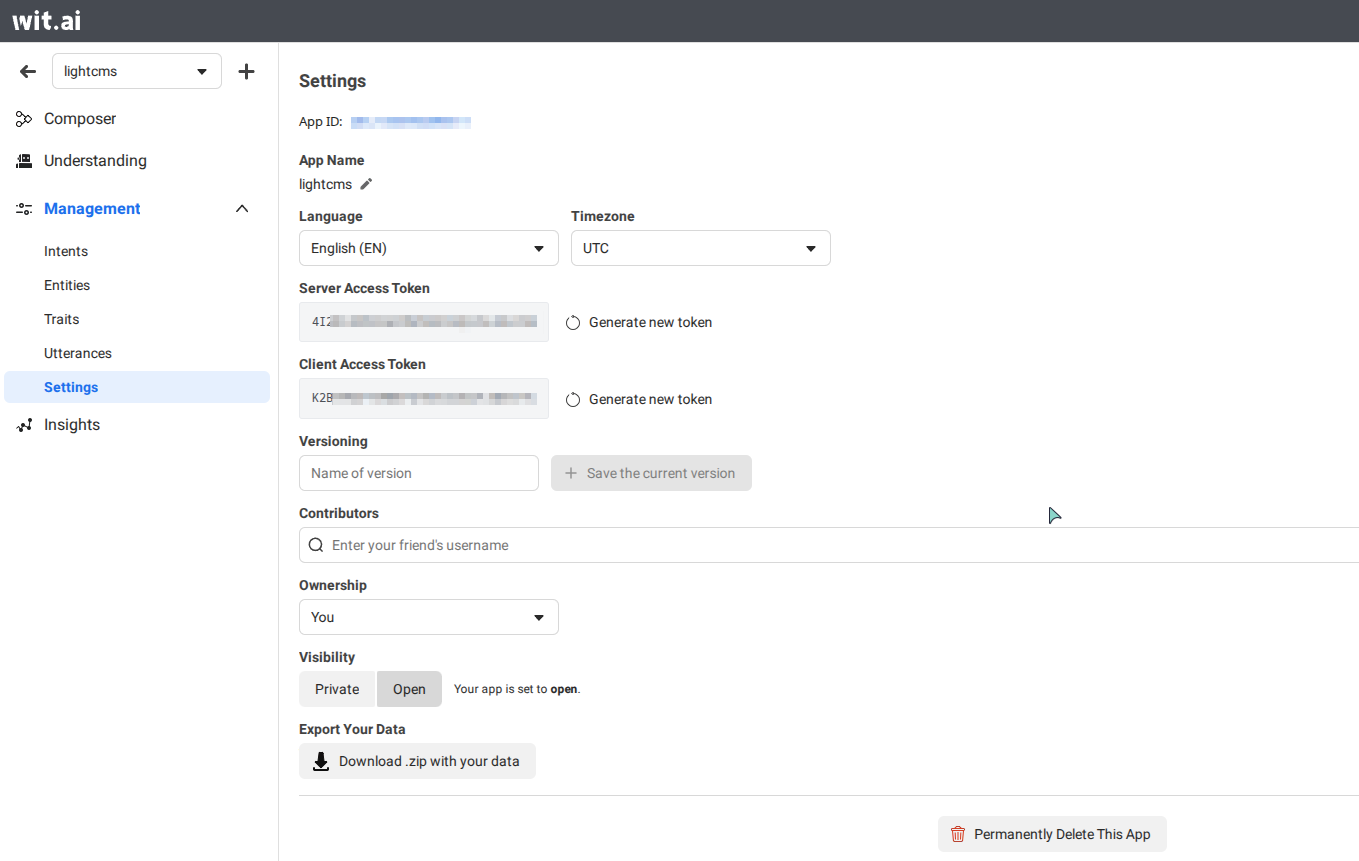
WIT_AI_TOKEN="服务器访问令牌"
Wit_AI_CLIENT_TOKEN="客户端访问令牌"
APP_ID=
BETTER_AUTH_SECRET=
BETTER_AUTH_URL=
CDN_KEY=
CDN_URL=
DATABASE_URL=
GITHUB_APP_ID=
GITHUB_APP_NAME=
GITHUB_CLIENT_ID=
GITHUB_CLIENT_SECRET=
GITHUB_PRIVATE_KEY=
GITHUB_WEBHOOK_SECRET=
MAIL_FROM=
MAIL_HOST=
MAIL_PASS=
MAIL_PORT=
MAIL_SECURE=
MAIL_USER=
OPEN_AI_ENDPOINT=
OPEN_AI_MODEL=
OPEN_AI_APIKEY=
ORIGIN=
PRIVATE_KEY=
VITE_POSTHOG_HOST=
VITE_POSTHOG_PROJECT_TOKEN=
SPEECH_API_KEY=
SPEECH_ENDPOINT=
SPEECH_MODEL=
WEBHOOK_SECRET=
WIT_AI_CLIENT_TOKEN=
WIT_AI_TOKEN=